Microsoft
Word 2003
Introduction:- Microsoft Office is
application software developed by Microsoft Company. Microsoft Word is a member
of Microsoft Office.
Microsoft Word is a word processor program
that is used to write, edit, and print the document. Word processors are widely
used in offices, newspapers, industries etc.
Note:
- Extension of MS-Word 2003
program is .doc & its higher version is .docx.
Some
of the other popular word processors are:-
1. OpenOffice Writer
2. AbiWord 3. LiberOffice Writer
4. PolyEdit
5. Jarte
5. Jarte
6. YWriter
Features of a word processor:-
- It helps to create the documents fast than the traditional type writer.
- Typing errors can be easily corrected, as the text can be pre-viewed on the screen.
- It helps in automatic checking of spelling and grammar errors in the document.
- Graphics, diagrams, charts, and tables can be easily inserted in the document to make it more communicative.
- The documents can be saved in the computer’s memory for future use.
To Start MS-Word:-
- Start → All Program → Microsoft Office → Microsoft Word 2003 OR
- Start → Run → Winword ( Windows Key + R = To Open Run Dialog Box ) OR
- C:\>Start Winword ← ( Via Command Prompt )

Title Bar:-
At the top often open the window is the Title bar displays the name of the application at the left edge and name of the document you have open. On the right edge of the Title bar the minimize, restore/maximize and close buttons are placed.
Note:- By double click on the Title bar, you can restore or maximize the window.
Menu Bar:-

Menu Bar is located just below the Title bar . It is the collection of options that contains all the commands related to MS-Word.
(a) File:- This menu has all the commands related to the file operation like creating a new document, saving, opening, printing etc.
Note:- Underline ( File ) indicates the Alt key, You can open file menu drop down list via keyboard using the Alt+F.
(b) Edit:- This menu has all the commands related to the editing the document like cut, copy, paste, delete etc.
(c) View:- This menu has all the commands related to the controlling of the view to the document like print layout, web layout, zoom etc.
(d) Insert:- This menu has the commands related to inserting objects, date & time, page number, footnotes, header & footer etc.
(e) Format:- This menu is related to formatting of the document like text formatting, column & paragraph formatting etc.
(f) Tool:- This menu has all the options related to the word processing tools namely, spelling & grammar checking, word count, thesaurus, macro, protection etc.
(g) Table:- This menu has all the commands related to inserting & modifying tables.
(h) Window:- This menu has all the commands related to working in the windows.
(i) Help:- This menu has all the commands related to getting help for MS-Word.
Toolbar:- Toolbar allows you to access the frequently used commands. The buttons on the toolbar represent the command and we can access all these commands.
To display a toolbar, press Alt and then Shift+F10.
Standard Toolbar:- To display a toolbar, press Alt and then Shift+F10.
1. New ( Ctrl+N):- To create a new document. In MS-Word, document is a file i.e. collection of pages.
2. Open (Ctrl+O):- To open an existing document.
3. Save (Ctrl+S):- To save a document.
4. Print (Ctrl+P):- To print a document.
5. Print Preview ( Ctrl+F2):- Preview of a document before printing.
6. Spelling & Grammar ( F7 ):- To check spelling & grammar error of the text.
Note:- Red line indicates the spelling error while green line indicates the grammatical or sentence error.
7. Research (Ctrl+Shift+O):- Research tool gives you a variety of feature like Thesaurus via you can find the synonyms & antonyms of a word, Translation, Online dictionary etc.
8. Cut (Ctrl+X ):- Cut the current selection to the Clipboard.
9. Copy ( Ctrl+C ):- Copy the current selection to the Clipboard.
10. Paste ( Ctrl+V ):- Paste the text in the document from the Clipboard which was cut or copy where cursor is placed.
11. Format Painter ( Ctrl+Shift+C ):- Copies the formatting of the selected text.
12. Undo ( Ctrl+Z):- Reverse the action.
13. Redo (Ctrl+Y):- Repeat the action or opposite of the undo.
14. Hyperlink (Ctrl+K):- Links the document to another.
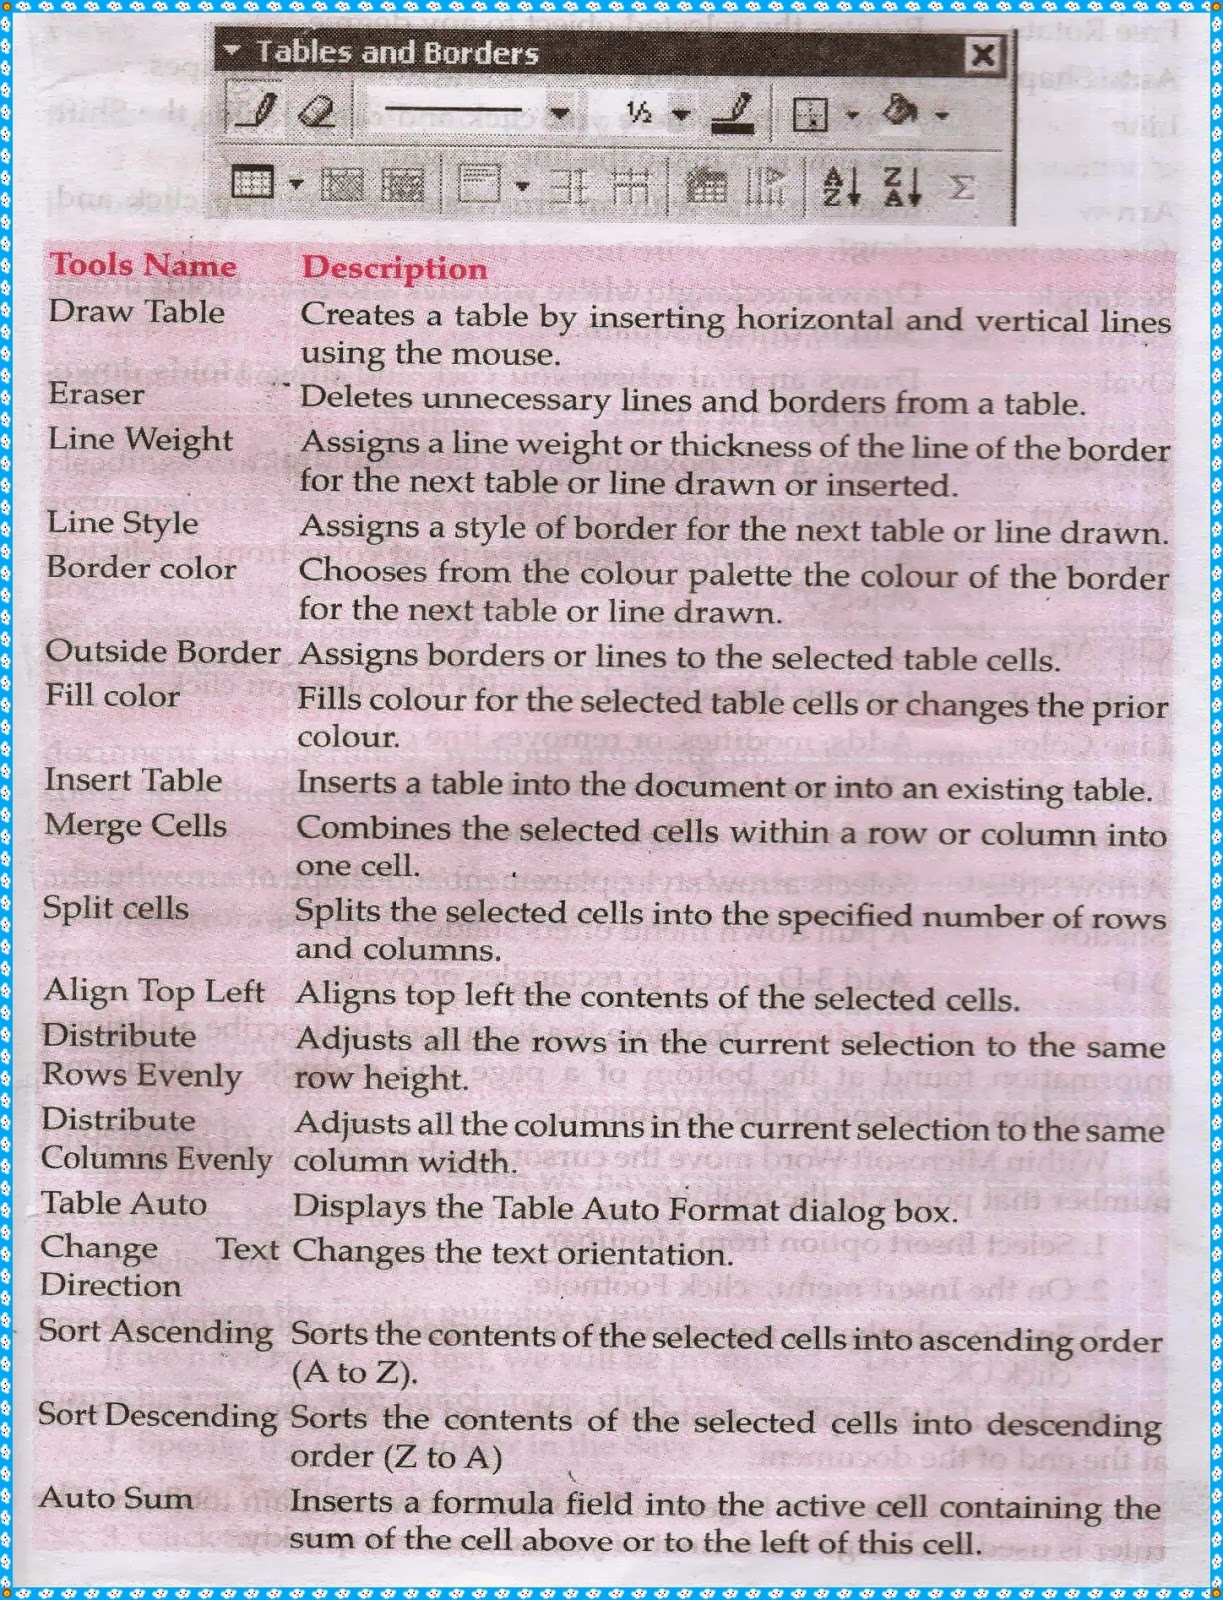
15. Tables & Borders:- Draws the tables & borders.
16. Insert Table:- To insert the table via highlighted number of rows & columns desired.
17. Insert Microsoft Excel Worksheet:- To insert the excel worksheet.
18. Columns:- To insert the number of columns in the document.
19. Drawing:- Brings up the drawing toolbar.
20. Document Map:- The document map is the separate pane that displays a list of headings in the document. When you click a heading in the Document Map, MS-Word jumps to the corresponding heading in the document, displays it at the top of the window and highlights the heading in the Document Map.
Note:- Heading 1 = Ctrl+Alt+1, Heading 2 = Ctrl+Alt+2, Heading 3 = Ctrl+Alt+3
21. Show/Hide:- Show or hide the paragraph mark.
Q.What is a Paragraph?
Ans. In Word, when you start typing in a new document, you enter text in the first paragraph. Word does not impose any limit on the size of the paragraph. Your paragraph may have any number of lines. When you press the Enter key, Word ends the paragraph and starts a new one. Thus, only the Enter key marks the end of the current paragraph and starts a new paragraph.
Note:- To select a paragraph, triple-click the mouse anywhere in that paragraph.
22. Zoom ( Ctrl+Scroll Mouse ):- Zooming up the document. ( 10% - 500% ).
23. Help ( F1 ):- Get help or visit Microsoft Office website.
24. Reading Layout:- Shows the document in the reading layout view.
Formatting Toolbar:-
1. Style ( Ctrl+Shift+S ):- A style is a set of formatting characteristics that you can apply to text in your document to quickly changes its appearance.
Note:- You can also create a new style with the help of Styles & Formatting Task Pane window.
2. Font ( Ctrl+Shift+F, Ctrl+D ):- MS-Word allows you to use more than one font in a document. Font refers to the shape and style of characters. The same character can be printed in different shapes and styles. Each particular shape and style of the character set is given a font name, such as Times New Roman, Arial, Comic Sans MS, etc.
3. Font Size ( Ctrl+Shift+P):- The drop- down list box shows the different font size, enter or select the font size. In Word, the character size is specified in points that ranges 8 to 72. (72 points are equal to 1 Inch).
Note:- Increase Font Size = Ctrl+Shift+> & Decrease Font Size = Ctrl+Shift+<
4. Bold ( Ctrl+B ):- Change selected text to Bold.
5. Italic ( Ctrl+I ):- Change selected text to Italic.
6. Underline ( Ctrl+U):- Underline selected text.
Note:- Double Underline = Ctrl+Shift+D & Underline at the every word = Ctrl+Shift+W
7. Left Align ( Ctrl+L ):- Align text the left margin.
8. Center ( Ctrl+E ):- Center text.
9. Right Align (Ctrl+R ):- Align text with the right margin.
10 Justify ( Ctrl+J ):- Justify text so all lines are equal in length.
11. Line Spacing:- Adjust the line spacing.
Note:- Single Spacing = Ctrl+1 & Line Spacing 1.5 = Ctrl+5 & Double Spacing= Ctrl+2
12. Numbering:- Create a numbered list.
13. Bullets:- Create an unordered list, bulleted list.
14. Decrease Indent:- Decreases the indentation of the current selection (to the left).
15. Increase Indent:- Increases the indentation of the current selection (to the right).
Note:- Hanging Indent = Ctrl+T & Indent = Ctrl+M & Un Indent = Ctrl+Shift+M
16. Outside Border:- Places a border around the current selection; click the drop-down for a wide selection of bordering options.Note:- Increase Font Size = Ctrl+Shift+> & Decrease Font Size = Ctrl+Shift+<
4. Bold ( Ctrl+B ):- Change selected text to Bold.
5. Italic ( Ctrl+I ):- Change selected text to Italic.
6. Underline ( Ctrl+U):- Underline selected text.
Note:- Double Underline = Ctrl+Shift+D & Underline at the every word = Ctrl+Shift+W
7. Left Align ( Ctrl+L ):- Align text the left margin.
8. Center ( Ctrl+E ):- Center text.
9. Right Align (Ctrl+R ):- Align text with the right margin.
10 Justify ( Ctrl+J ):- Justify text so all lines are equal in length.
11. Line Spacing:- Adjust the line spacing.
Note:- Single Spacing = Ctrl+1 & Line Spacing 1.5 = Ctrl+5 & Double Spacing= Ctrl+2
12. Numbering:- Create a numbered list.
13. Bullets:- Create an unordered list, bulleted list.
14. Decrease Indent:- Decreases the indentation of the current selection (to the left).
15. Increase Indent:- Increases the indentation of the current selection (to the right).
Note:- Hanging Indent = Ctrl+T & Indent = Ctrl+M & Un Indent = Ctrl+Shift+M
17. Highlight:- Highlight the current selection; default color is yellow.
18. Font Color:- Change the font color; the default/automatic color is black.
Drawing Toolbar:-
 1. Auto Shapes:- Auto Shapes allows you to add shapes to your document such as stars, banners, hearts, arrows, and callouts to enhance visual appeal.
2. Line:- Allows you to draw customized straight lines.
3. Arrow:- Allows you to draw customized straight arrows.
4. Rectangle:- Allows you to draw customized rectangles and squares.
5. Oval:- Allows you to draw customized ovals and circles.
6. Text Box:- Allows you to draw customized text boxes for the purpose of placing text on a document.
7. Word Art:- Allows you to insert Word Art.
Word Art allows you to add titles, headings, or special words and phrases to a document in an artistic and visually interesting manner.
8. Diagram:- Opens a diagram and chart gallery which allows you to select specified diagrams and charts.
9. Insert Clip Art:- Allows you to insert clipart from the Microsoft Word clipart gallery.
10. Insert Picture:- Allows you to insert customized pictures into a document.
11. Fill Color:- Allows you to fill rectangles, ovals, and drawing objects with color.
12. Line Color:- Allows you to change line color.
13. Font Color:- Allows you to change font color.
14. Line Style:- Allows you to change the thickness and style of lines.
15. Dash Style:- Allows you to change the style of dashed lines.
16. Arrow Style:- Allows you to change the style of straight-line arrows.
17. Shadow Style:- Allows you to select a variety of shadow styles to place shadows around drawing objects.
18. 3-D Style:- Allows you to select from a variety of 3-D styles to convert a drawing object to 3-D.
_____________________________Menu Bar____________________________
File Menu:-
 Close ( Ctrl+W ):- To close the current document.
Save ( Ctrl+S ) and Save As ( F12 ):-
Save and Save As option do the same work of saving a document but the difference between both options is that the Save As command every time gives you the Save As dialog box and you can save the file with different names also. But the Save option will gives you the Save As dialog box when you are saving the document for every first time. Other times it will save the document with the previous name without giving any dialog box.
Note:- The file name can contain up to 256 characters.
Save as Web Page:- To save the document as a web page.
File Search:- To search a file.
Web Page Preview:- To use this procedure to preview your document or Web page in your default Web browser.
Page Setup:- The Page Setup command enables you to define the page size, margins ( top, bottom, left, right, etc. ), orientation ( portrait or landscape ),etc. for your document.
This helps you to precisely control the appearance of your page.
 Gutter Margin:- In the Page Setup dialog box, you find a text box for the gutter margin. The gutter margin is also called the binding margin. This margin is used only when you want to prepare a document that will be bound and you want to leave a specific margin for binding. The default value of the Gutter margin is Zero (0).
Header and Footer Margin:- The header margin is measured from the top edge of paper and the footer margin is measured from the bottom edge of the paper. The default values of these margins is 0.5".
Print Preview ( Ctrl+F2 ):- Print Preview provides a miniature view of how a document will look when it is printed. We can use print preview to examine and adjust the layout of a document before we actually print it.
Print ( Ctrl+P ):- To print the document as a hard copy.
Send To:- To send the Word document as an e-mail message.
Properties:- Document properties, also known as metadata(data about data), are details about a file that describes or identify it. Document properties include details such as title, author name, subject, and keywords that identify the document's topic or contents.
Exit ( Alt+F4 ):- To exit the current program.
________________________________________________________________
Edit Menu:-

Using Cut and Paste to Move Text:-
In the Cut and Paste method, you need to perform the following steps:-
1. Cut the selected text, If the text is not already selected, select the text prior or using the Cut command. Word cuts (deletes) the selected text and preserves it in its memory (Clipboard).
2. Move the cursor where you want to place the text.
3. Use the Paste command, Word paste the 'cut-text' from the memory (Clipboard) at the position of the cursor.
Using Keyboard Shortcut to Move Text:-
1. Select the text that you to move using the keyboard or mouse.
2. Press the F2 function key, Word displays a message, "Move to where?" in the status bar.
3. Move the cursor where you want to move the text and then press the Enter key.
Using the Mouse to Move Text:-
1.If you are comfortable with using mouse , you can move the text anywhere in the document by dragging it.
Using Copy and Paste to Copy Text:-
1. Select the text that you want to copy.
2. Use the Copy command to copy the text in the memory (Clipboard).
3. Move the cursor to the place where you want to repeat (Copy) the text, and then use the Paste command.
Using the Mouse to Copy Text:-
1. Select the text and hold the Ctrl key, without releasing the Ctrl or mouse button, drag the mouse pointer where you wish to copy the text. As you drag the mouse, a dotted vertical line also moves. Make sure the dotted line is placed where you to copy the text.
Office Clipboard:-The Clipboard Task Pane Window temporarily holds the item which was cut or copy in the Clipboard memory up to 24 times. To open Office Clipboard press Ctrl+C twice.
Paste Special:- Insert the contents of the Clipboard as Picture Format, HTML Format, Unformatted Text Format etc. where cursor is placed.
Clear:- To clear the formatting of the selected text and also delete the selected contents.
Note:- To Clear the Formatting = Ctrl+Space bar
Select All ( Ctrl+A ):- To select the entire document.
Find ( Ctrl+F ):- Find feature lets you search through lengthy documents for a particular word, phrase, or character string.


Word provides you a wide variety of views to work or to see your document in different ways.
Normal View:-
1. It has only horizontal ruler.
2. It does not display margins.
3. It does not display header & footer.
4. It displays dotted page break.
Web Layout View:-
1. It is like as Web Page.
2. It has only horizontal ruler.
3. It has only one page.
Outline View:-
1. It displays text in outline format.
2. It displays headings or any level.
3. It displays outline hierarchy.
Print Layout View:-
1. It is default layout view of MS-Word.
2. It displays both rulers.
3. It displays margins.
4. It displays header and footer.
5. It is the best view.
Full Screen View:-
1. It displays text or document in the whole screen.
2. It hides temporarily Menu bar, Toolbars.
Reading Layout View:-
1. If you are opening a document primarily to read it, reading layout view optimizes the reading experience. Reading layout view hides all toolbars except for the Reading Layout and Reviewing toolbars.
Note- Reading Layout View = Alt+R , To close Reading Layout view = Esc or Alt+C.
Task Pane ( Ctrl+F1 ):- By default, when you start Word the Getting Started task pane appears at the right edge of your Word window to give you a quick way to open a document, start a new document.
The task pane is one of many that appear automatically when you perform certain actions, such as starting Word, inserting clip art in your document, or beginning a mail merge. Task panes typically contain information and options that are relevant to what you are doing. They give you a handy way of accomplishing tasks without leaving your document.
Toolbars:- A bar with buttons and options that you use to carry out commands, To display a toolbar, press Alt and then Shift+F10.
Ruler:- To show or hide ruler.
Thumbnails:- Thumbnails to display a vertical pane along the left side of the Word window that contains miniature form of each page in the current document. By clicking on a particular page, you can jump quickly on that page.
Header and Footer:- The Header and Footer feature allows you to place specified content in the top and bottom of the margins that include text or graphics such as page numbers, the data, a company logo, the document's title or file name etc. The content repeats on every page of the document unless separated by a section break.
Markup:- To show or hide the comments.
_______________________________________________________________
Insert Menu:-
 Break:-
a. Page Break (Ctrl+Enter ):- Page break is a point where one page end and another one start. Word inserts a page break automatically every time it reaches the bottom of a page. These breaks are called soft page breaks.
You can insert hard page breaks manually whenever you want to force a page break at a particular point in a document.
 b. Column Break:- To insert a Column Break when you want to force the end of a column and the beginning of another.
c. Text Wrapping Break:- A text wrapping break ends the current line and forces the text to continue below a picture, table, or other item. The text continues on the next blank line that does not contain a picture or table aligned with the left or right margin. A text wrapping break is designed for use with a Web Page.
d. Section Break:- When you start a document, there are no section breaks because the entire document consists of one section. A section break is the point at which you end one section and begin another because Word automatically applies all page formatting to your entire document. In many cases, you need to alter this behavior.
Section and page properties include the following settings:-
1. Page Orientation ( Portrait/Landscape )
2. Margins
3. Columns
4. Line Numbering
5. Vertical Alignment
6. Header & Footer
7. Page Numbering
8. Paper Size
Note:- It's easiest to work with section breaks in Norma View because the breaks are labeled on screen.
Page Numbers:- This option would be chosen to insert the page numbers in the document at the required position.
Date and Time:- This is used to insert the Date and Time values in the current document where cursor is placed.
Note:- Current Date = Alt+Shift+D & Current Time = Alt+Shift+T
Auto Text:- It is also called as Glossary. You can save frequently used text or graphics to Auto text Entries. After they are saved, they can quickly be inserted in a document any time you need them.
Note:- To accept the Auto Complete suggestion, press Enter key.
Field:- Fields are like placeholders indicating where data is to be placed in a document. This is useful if you are making letters or address labels, as well as when you mail merge documents.
Symbols:- You can insert a whole set of typographical symbols into your document where cursor is placed. These include Mathematical, Greek, Japanese and Winding Symbols. The number of symbols available to you depends on what fonts are installed on you computer.
Comment ( Alt+Ctrl+M ):- MS Word provides several tools for document collaboration. One of these features allows you to insert comments into a document and provide suggestions to the document's author without changing the original text that do not print out.
To Insert Comment:-
1. Select the text or item you want to comment.
2. On the Insert menu, click Comment.
3. Type the comment text in the comment balloon.
Reference:-
A. Footnote and Endnote:- You might have been seen footnotes and endnotes in some books and articles. Footnote is a remark, placed on bottom of current page. Endnote is also a remark, placed on end of file.
Use Following Step:-
a. Select the target and go Insert menu and choose Footnote.
b. It displays a Footnote and Endnote dialog box.
c. Select Footnote/Endnote and Click Ok.
d. Now, you can type your note.
B. Caption:- You can use captions in Word documents to label figures, tables, equations and so on. A caption is a label for an item that consists of two parts. The label you select ( Figures, Tables, Equations) and a number inserted by Word. For example, Figure 1.
C. Cross-Reference:- A cross-reference is a pointer or link to an item that is in another location in a document- for example, "See Figure 1" to link to a salient graphic. You can create cross-references to headings, footnotes, bookmarks, captions, and numbered graphics.
D. Index and Tables:-
Create the Table of Contents:-
1. Set up your document using hierarchical heading styles for your headings and sub-headings.
2. Click where you want your Table of Contents to appear.
3. Choose Insert--> Reference--> Index and Tables.
4. Click on the Table of Contents tab & Click ok button.
Picture:-
1. Clip Art:- To insert a variety of pictures, sounds, and video are available in Word 2003 through the Microsoft Clip Organizer.
Click Insert Menu --> Picture--> Clip Art
2. From File:- To insert picture from anywhere in the compute system of different format.
3. From Scanner or Camera:- To insert the picture from the other resources like Scanner or Camera.
4. New Drawing:- When you create a drawing in MS Word, by default, a drawing canvas is placed around it. The drawing canvas helps you arrange and re-size the objects in your drawing.
Note:- You can use Align or Distribute command ( Draw button on the Drawing toolbar) to arrange objects on the canvas.
5. Autoshapes:- Auto Shapes allows you to add shapes to your document such as stars, banners, hearts, arrows, and cal-louts to enhance visual appeal.
6. Word Art:- Word Art allows you to add titles, headings, or special words and phrases to a document in an artistic and visually interesting manner.
7. Organization Chart:- Used to show hierarchical relationships.
8. Chart:- To insert the chart in current document. Chart is the graphical representation of the data.
Text Box:- Text boxes provides a great deal of flexibility in arranging text on a page. You can use them for sidebars, pull quotes in newspaper or magazine- styles articles, and text labels in a drawing, among other things.
You can also link text boxes together so that text flows from one text box into the next.
File:- To insert the existing file contents into the current file.
Object (OLE=Object Linking and Embedding):- To insert an object of the other program in our current document like bitmap graphics etc.
OLE is a framework developed by Microsoft that allows you to take objects from a document in one application and place them in another.
Bookmark:- A bookmark is an item or location in a document that you identify and name for future reference. You can use bookmark to quickly jump to a specific location in your current document.
___________________________________________________________
Format Menu:-

Font ( Ctrl+D ):- You can change the Font appearance using the Font Dialog Box, there is a set of formatting available like font type, font style, font size, font color, underline and different effects like Strike-through, Double Strike-through, and Superscript & subscript etc.
 Note:- Superscript= Ctrl + Shift + = & Subscript= Ctrl + =
Appy All Capital= Ctrl + Shift + A
Change between all Upper, First letter upper and all lower-case = Shit+F3
Paragraph:- A Paragraph Dialog Box provides a set of paragraph formatting like paragraph alignment, paragraph indentation, paragraph spacing etc.
Borders and Shading:- Using the Borders and Shading dialog box, you can apply border around a selected text or paragraph and also apply page border & shading effect.
Tab:- Tabs come in different types which are defined by the way text aligns with the tab. The following table explains the different tab types.
 Note:- By default, a Word document has built-in tab stops at half-inch intervals.
Drop Cap:- The first character of the paragraph is much bigger than rest of the text. This effect is called the Drop Cap effect. The initial character can be dropped in the paragraph or in the margins.
Follow these steps:-
1. Select the paragraph that you want to show in the Drop Cap effect.
2. Open the Format menu and then choose the Drop Cap command form the menu.
3. Select the Drop Cap style and click OK.
Change Case:- To change the case of the selected text.
 Background:- To change background color of the current document.
Watermark Effect:- Watermarks are used to print text or a graphic behind document text. Watermarks are transparent, and therefore any text or inserted object printed over a watermark is clearly visible.

Note:- You can edit Watermark Effect through header & footer option.
Theme:- A theme is a predefined set of styles for a document. You can quickly change the
elements of a document which defined in the theme like background colors, headings and regular paragraph style, horizontal lines, bulleted, numbered list, table borders and colors etc.
Frames:- Frames are sub-windows that divided the browser/Word window into sub-parts. Each frame is a placeholder that can hold text,picture etc & worked individually.
Reveal Formatting:- Reveal Formatting pane, you display it by pressing Shift+F1. It shows all of the formatting that's common to the selected text, or that's applied at the insertion point. It has three segment: Font (character formatting), Paragraph (spacing,alignment), and Section (margin,page).
_________________________________________________________________

Word Count:- Word Count is also metadata that helps you can count the number of words for an entire document or for a selection of text in the document. You can also count the number of pages, paragraphs, lines and characters.
AutoSummarize:- AutoSummarize determines key points by analyzing the document and assigning a score to each sentence that readers can quickly scan.
We can select whether to highlight key point in a document, insert an executive summary or abstract at the top of a document, create a new document and put the summary there.
Track Changes:- In Word Processing, track changes is an editing command that is commonly used when you create an original document and make changes and want to keep track of the changes that are made to that original document. It is also a useful tool for collaborating on a document, as it allows multiple users to make revisions without losing the context of the original document.
Compare and Merge Documents:- The Compare and Merge feature of Microsoft Word allows you to compare two documents and merge them into one document.
Protect Document:- You can apply formatting restrictions and editing restrictions in your document by given password.
Online Collaboration:- Collaboration is a process in which two or more people or group of people work together in order to achieve a Common goal, such as completing an application, or finishing an artistic project.
This term is often used in technology to indicate that people or organizations are working together on software, application, web sites or other technical projects.
Letters and Mailings:-
a. Mail Merge:- Mail Merge is a very useful and powerful addition to the primary feature of Word, word processing. You can use Mail Merge to print personalised form letters, envelopes, mailing labels, etc. Form letters are those letters that have the same contents. These letters are sent to sevral persons. Business letters describing the launch of a new product, call letters for interviews, notices for a meeting, invitations to a party etc.
There are three steps to use Mail Merge:-
1. Create a main document/Master Document
2. Create a data source/Data File
3. Merge the data source with the main document.
Mail Merge Steps:-
1.Mail Merge Step Download
2.Mail Merge Step Using MS Excel Download
Envelopes and Label:-
To generate an envelope and setting for delivery address and return address, use following steps:-
1. On the Tools menu, point to Letters an Mailings, and then click Envelopes and Labels.
2. Click the Envelopes tab.
3. In the Delivery address box, enter the mailing address.
4. In the Return address box, enter the return address.
5. You can customize the envelope by clicking on Option button.
6. Click to Add to Document button.
Labels:- If you want to create simple address labels, use following steps:-
1. On the Tools menu, point to Letters an Mailings, and then click Envelopes and Labels.
2. It displays Envelopes and Labels dialog box.
3. Select Label tab.
4. Type content and click New Document.
Table:-
--------------------------------------------------------------------------------
 Further Readings:-
1. MS-Word Shortcut Key

Save ( Ctrl+S ) and Save As ( F12 ):-
Save and Save As option do the same work of saving a document but the difference between both options is that the Save As command every time gives you the Save As dialog box and you can save the file with different names also. But the Save option will gives you the Save As dialog box when you are saving the document for every first time. Other times it will save the document with the previous name without giving any dialog box.
Note:- The file name can contain up to 256 characters.
Save as Web Page:- To save the document as a web page.
File Search:- To search a file.
Web Page Preview:- To use this procedure to preview your document or Web page in your default Web browser.
Page Setup:- The Page Setup command enables you to define the page size, margins ( top, bottom, left, right, etc. ), orientation ( portrait or landscape ),etc. for your document.
This helps you to precisely control the appearance of your page.

Header and Footer Margin:- The header margin is measured from the top edge of paper and the footer margin is measured from the bottom edge of the paper. The default values of these margins is 0.5".
Print Preview ( Ctrl+F2 ):- Print Preview provides a miniature view of how a document will look when it is printed. We can use print preview to examine and adjust the layout of a document before we actually print it.
Print ( Ctrl+P ):- To print the document as a hard copy.
Send To:- To send the Word document as an e-mail message.
Properties:- Document properties, also known as metadata(data about data), are details about a file that describes or identify it. Document properties include details such as title, author name, subject, and keywords that identify the document's topic or contents.
Exit ( Alt+F4 ):- To exit the current program.
________________________________________________________________
Edit Menu:-

Using Cut and Paste to Move Text:-
In the Cut and Paste method, you need to perform the following steps:-
1. Cut the selected text, If the text is not already selected, select the text prior or using the Cut command. Word cuts (deletes) the selected text and preserves it in its memory (Clipboard).
2. Move the cursor where you want to place the text.
3. Use the Paste command, Word paste the 'cut-text' from the memory (Clipboard) at the position of the cursor.
Using Keyboard Shortcut to Move Text:-
1. Select the text that you to move using the keyboard or mouse.
2. Press the F2 function key, Word displays a message, "Move to where?" in the status bar.
3. Move the cursor where you want to move the text and then press the Enter key.
Using the Mouse to Move Text:-
1.If you are comfortable with using mouse , you can move the text anywhere in the document by dragging it.
Using Copy and Paste to Copy Text:-
1. Select the text that you want to copy.
2. Use the Copy command to copy the text in the memory (Clipboard).
3. Move the cursor to the place where you want to repeat (Copy) the text, and then use the Paste command.
Using the Mouse to Copy Text:-
1. Select the text and hold the Ctrl key, without releasing the Ctrl or mouse button, drag the mouse pointer where you wish to copy the text. As you drag the mouse, a dotted vertical line also moves. Make sure the dotted line is placed where you to copy the text.
Office Clipboard:-The Clipboard Task Pane Window temporarily holds the item which was cut or copy in the Clipboard memory up to 24 times. To open Office Clipboard press Ctrl+C twice.
Paste Special:- Insert the contents of the Clipboard as Picture Format, HTML Format, Unformatted Text Format etc. where cursor is placed.
Clear:- To clear the formatting of the selected text and also delete the selected contents.
Note:- To Clear the Formatting = Ctrl+Space bar
Select All ( Ctrl+A ):- To select the entire document.
Find ( Ctrl+F ):- Find feature lets you search through lengthy documents for a particular word, phrase, or character string.
Replace ( Ctrl+H ):- Find and Replace Text allows you to change a word throughout a document without searching for the word and re-typing it each time.
Go To ( Ctrl+G, F5 ):- Go To feature lets you to jump a specific page, section, line, bookmark etc. in the current document.

_________________________________________________________________________________
View:- 
Word provides you a wide variety of views to work or to see your document in different ways.
Normal View:-
1. It has only horizontal ruler.
2. It does not display margins.
3. It does not display header & footer.
4. It displays dotted page break.
Web Layout View:-
1. It is like as Web Page.
2. It has only horizontal ruler.
3. It has only one page.
Outline View:-
1. It displays text in outline format.
2. It displays headings or any level.
3. It displays outline hierarchy.
Print Layout View:-
1. It is default layout view of MS-Word.
2. It displays both rulers.
3. It displays margins.
4. It displays header and footer.
5. It is the best view.
Full Screen View:-
1. It displays text or document in the whole screen.
2. It hides temporarily Menu bar, Toolbars.
Reading Layout View:-
1. If you are opening a document primarily to read it, reading layout view optimizes the reading experience. Reading layout view hides all toolbars except for the Reading Layout and Reviewing toolbars.
Note- Reading Layout View = Alt+R , To close Reading Layout view = Esc or Alt+C.
Task Pane ( Ctrl+F1 ):- By default, when you start Word the Getting Started task pane appears at the right edge of your Word window to give you a quick way to open a document, start a new document.
The task pane is one of many that appear automatically when you perform certain actions, such as starting Word, inserting clip art in your document, or beginning a mail merge. Task panes typically contain information and options that are relevant to what you are doing. They give you a handy way of accomplishing tasks without leaving your document.
Toolbars:- A bar with buttons and options that you use to carry out commands, To display a toolbar, press Alt and then Shift+F10.
Ruler:- To show or hide ruler.
Thumbnails:- Thumbnails to display a vertical pane along the left side of the Word window that contains miniature form of each page in the current document. By clicking on a particular page, you can jump quickly on that page.
Header and Footer:- The Header and Footer feature allows you to place specified content in the top and bottom of the margins that include text or graphics such as page numbers, the data, a company logo, the document's title or file name etc. The content repeats on every page of the document unless separated by a section break.
Markup:- To show or hide the comments.
_______________________________________________________________
Insert Menu:-

a. Page Break (Ctrl+Enter ):- Page break is a point where one page end and another one start. Word inserts a page break automatically every time it reaches the bottom of a page. These breaks are called soft page breaks.
You can insert hard page breaks manually whenever you want to force a page break at a particular point in a document.

c. Text Wrapping Break:- A text wrapping break ends the current line and forces the text to continue below a picture, table, or other item. The text continues on the next blank line that does not contain a picture or table aligned with the left or right margin. A text wrapping break is designed for use with a Web Page.
d. Section Break:- When you start a document, there are no section breaks because the entire document consists of one section. A section break is the point at which you end one section and begin another because Word automatically applies all page formatting to your entire document. In many cases, you need to alter this behavior.
Section and page properties include the following settings:-
1. Page Orientation ( Portrait/Landscape )
2. Margins
3. Columns
4. Line Numbering
5. Vertical Alignment
6. Header & Footer
7. Page Numbering
8. Paper Size
Note:- It's easiest to work with section breaks in Norma View because the breaks are labeled on screen.
Page Numbers:- This option would be chosen to insert the page numbers in the document at the required position.
Date and Time:- This is used to insert the Date and Time values in the current document where cursor is placed.
Note:- Current Date = Alt+Shift+D & Current Time = Alt+Shift+T
Auto Text:- It is also called as Glossary. You can save frequently used text or graphics to Auto text Entries. After they are saved, they can quickly be inserted in a document any time you need them.
Note:- To accept the Auto Complete suggestion, press Enter key.
Field:- Fields are like placeholders indicating where data is to be placed in a document. This is useful if you are making letters or address labels, as well as when you mail merge documents.
Symbols:- You can insert a whole set of typographical symbols into your document where cursor is placed. These include Mathematical, Greek, Japanese and Winding Symbols. The number of symbols available to you depends on what fonts are installed on you computer.
Comment ( Alt+Ctrl+M ):- MS Word provides several tools for document collaboration. One of these features allows you to insert comments into a document and provide suggestions to the document's author without changing the original text that do not print out.
To Insert Comment:-
1. Select the text or item you want to comment.
2. On the Insert menu, click Comment.
3. Type the comment text in the comment balloon.
Reference:-
A. Footnote and Endnote:- You might have been seen footnotes and endnotes in some books and articles. Footnote is a remark, placed on bottom of current page. Endnote is also a remark, placed on end of file.
Use Following Step:-
a. Select the target and go Insert menu and choose Footnote.
b. It displays a Footnote and Endnote dialog box.
c. Select Footnote/Endnote and Click Ok.
d. Now, you can type your note.
B. Caption:- You can use captions in Word documents to label figures, tables, equations and so on. A caption is a label for an item that consists of two parts. The label you select ( Figures, Tables, Equations) and a number inserted by Word. For example, Figure 1.
C. Cross-Reference:- A cross-reference is a pointer or link to an item that is in another location in a document- for example, "See Figure 1" to link to a salient graphic. You can create cross-references to headings, footnotes, bookmarks, captions, and numbered graphics.
D. Index and Tables:-
Create the Table of Contents:-
1. Set up your document using hierarchical heading styles for your headings and sub-headings.
2. Click where you want your Table of Contents to appear.
3. Choose Insert--> Reference--> Index and Tables.
4. Click on the Table of Contents tab & Click ok button.
Picture:-
1. Clip Art:- To insert a variety of pictures, sounds, and video are available in Word 2003 through the Microsoft Clip Organizer.
Click Insert Menu --> Picture--> Clip Art
2. From File:- To insert picture from anywhere in the compute system of different format.
3. From Scanner or Camera:- To insert the picture from the other resources like Scanner or Camera.
4. New Drawing:- When you create a drawing in MS Word, by default, a drawing canvas is placed around it. The drawing canvas helps you arrange and re-size the objects in your drawing.
Note:- You can use Align or Distribute command ( Draw button on the Drawing toolbar) to arrange objects on the canvas.
5. Autoshapes:- Auto Shapes allows you to add shapes to your document such as stars, banners, hearts, arrows, and cal-louts to enhance visual appeal.
6. Word Art:- Word Art allows you to add titles, headings, or special words and phrases to a document in an artistic and visually interesting manner.
7. Organization Chart:- Used to show hierarchical relationships.
8. Chart:- To insert the chart in current document. Chart is the graphical representation of the data.
Text Box:- Text boxes provides a great deal of flexibility in arranging text on a page. You can use them for sidebars, pull quotes in newspaper or magazine- styles articles, and text labels in a drawing, among other things.
You can also link text boxes together so that text flows from one text box into the next.
File:- To insert the existing file contents into the current file.
Object (OLE=Object Linking and Embedding):- To insert an object of the other program in our current document like bitmap graphics etc.
OLE is a framework developed by Microsoft that allows you to take objects from a document in one application and place them in another.
Bookmark:- A bookmark is an item or location in a document that you identify and name for future reference. You can use bookmark to quickly jump to a specific location in your current document.
___________________________________________________________
Format Menu:-

Font ( Ctrl+D ):- You can change the Font appearance using the Font Dialog Box, there is a set of formatting available like font type, font style, font size, font color, underline and different effects like Strike-through, Double Strike-through, and Superscript & subscript etc.

Appy All Capital= Ctrl + Shift + A
Change between all Upper, First letter upper and all lower-case = Shit+F3
Paragraph:- A Paragraph Dialog Box provides a set of paragraph formatting like paragraph alignment, paragraph indentation, paragraph spacing etc.
Borders and Shading:- Using the Borders and Shading dialog box, you can apply border around a selected text or paragraph and also apply page border & shading effect.
Tab:- Tabs come in different types which are defined by the way text aligns with the tab. The following table explains the different tab types.

Drop Cap:- The first character of the paragraph is much bigger than rest of the text. This effect is called the Drop Cap effect. The initial character can be dropped in the paragraph or in the margins.
Follow these steps:-
1. Select the paragraph that you want to show in the Drop Cap effect.
2. Open the Format menu and then choose the Drop Cap command form the menu.
3. Select the Drop Cap style and click OK.
Change Case:- To change the case of the selected text.

Watermark Effect:- Watermarks are used to print text or a graphic behind document text. Watermarks are transparent, and therefore any text or inserted object printed over a watermark is clearly visible.

Note:- You can edit Watermark Effect through header & footer option.
Theme:- A theme is a predefined set of styles for a document. You can quickly change the
elements of a document which defined in the theme like background colors, headings and regular paragraph style, horizontal lines, bulleted, numbered list, table borders and colors etc.
Frames:- Frames are sub-windows that divided the browser/Word window into sub-parts. Each frame is a placeholder that can hold text,picture etc & worked individually.
Reveal Formatting:- Reveal Formatting pane, you display it by pressing Shift+F1. It shows all of the formatting that's common to the selected text, or that's applied at the insertion point. It has three segment: Font (character formatting), Paragraph (spacing,alignment), and Section (margin,page).
_________________________________________________________________
Tools Menu:-

AutoSummarize:- AutoSummarize determines key points by analyzing the document and assigning a score to each sentence that readers can quickly scan.
We can select whether to highlight key point in a document, insert an executive summary or abstract at the top of a document, create a new document and put the summary there.
Track Changes:- In Word Processing, track changes is an editing command that is commonly used when you create an original document and make changes and want to keep track of the changes that are made to that original document. It is also a useful tool for collaborating on a document, as it allows multiple users to make revisions without losing the context of the original document.
Compare and Merge Documents:- The Compare and Merge feature of Microsoft Word allows you to compare two documents and merge them into one document.
Protect Document:- You can apply formatting restrictions and editing restrictions in your document by given password.
Online Collaboration:- Collaboration is a process in which two or more people or group of people work together in order to achieve a Common goal, such as completing an application, or finishing an artistic project.
This term is often used in technology to indicate that people or organizations are working together on software, application, web sites or other technical projects.
Letters and Mailings:-
a. Mail Merge:- Mail Merge is a very useful and powerful addition to the primary feature of Word, word processing. You can use Mail Merge to print personalised form letters, envelopes, mailing labels, etc. Form letters are those letters that have the same contents. These letters are sent to sevral persons. Business letters describing the launch of a new product, call letters for interviews, notices for a meeting, invitations to a party etc.
There are three steps to use Mail Merge:-
1. Create a main document/Master Document
2. Create a data source/Data File
3. Merge the data source with the main document.
Mail Merge Steps:-
1.Mail Merge Step Download
2.Mail Merge Step Using MS Excel Download
Envelopes and Label:-
To generate an envelope and setting for delivery address and return address, use following steps:-
1. On the Tools menu, point to Letters an Mailings, and then click Envelopes and Labels.
2. Click the Envelopes tab.
3. In the Delivery address box, enter the mailing address.
4. In the Return address box, enter the return address.
5. You can customize the envelope by clicking on Option button.
6. Click to Add to Document button.
Labels:- If you want to create simple address labels, use following steps:-
1. On the Tools menu, point to Letters an Mailings, and then click Envelopes and Labels.
2. It displays Envelopes and Labels dialog box.
3. Select Label tab.
4. Type content and click New Document.
Table:-

--------------------------------------------------------------------------------

1. MS-Word Shortcut Key